Static Objects ![]() ->
-> ![]() ->
-> ![]()
This is a more complex topic, but still relatively easy to master once you understand the basic mechanism of how Gardens of Gonzo renders a scene. Static objects probably make up for the most objects in the game world. Basically everything you see in the game world that isn’t a ground tile, mobile or usable, is a static object. Plants are static objects, trees, walls and roofs – and these are only a few examples, to give you an idea.
Layers and Rendering Order ![]() |
| ![]() |
| ![]() |
| ![]() |
| ![]() |
| ![]()
Why all this theory? Well, because we want to create the impression of depth, to make the game look and feel believable. To achieve this in a 2D-game without any 3D-information we need 2 things.
- Graphics that don’t look flat, e.g. graphics that illustrate something from a certain perspective.
-
A rendering order, that convincingly puts one object in front of or behind another to create the illusion that we are immersed in a spatial world.
Luckily, the first thing has been taken care of by the REFMAP crew. Those guys did an awesome pixel artist job! Also, they put their graphics online for free usage. Most of the graphics you see in-game are downloaded from First Seed Material. So don’t bother using up your own user space by uploading graphics from that site – they probably already are among the system graphics.
The overall rendering order has to be explained in two steps. First: the rendering order of whole layers of objects. Second: the per-layer rendering order. But first thing’s first. There are three object layers. When rendering the scene, the tile layer is drawn first. After that the three object layers are drawn in the following order:
- Ground Layer

Drawn directly after the tile layer. Put small rocks, plants, grass and flat things on this layer. Players are always above objects on this layer.
- Mid Layer

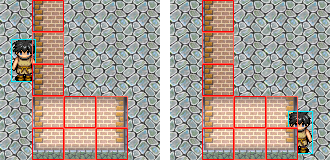
This is the layer where dynamic objects and mobiles (like players or NPCs) reside. The per-layer rendering order explanation later on strongly refers to the mid layer, as mobile objects move behind or in front of other objects on this layer and therefore change the actual object rendering order continuously. Trees, big stones, walls,… – as long as it is something that affects the space within the imaginary height level of your or any other character, it belongs on this layer.
- Top Layer

This layer is drawn last and therefore potentially obscures objects on lower layers. Use this for roofs. Or for something completely different. Remember, all these hints are only suggestions. Feel free to blow each other’s minds!
To make building easier, whole layers can be hidden and shown via the respective buttons: ![]()
![]()
![]() .
.
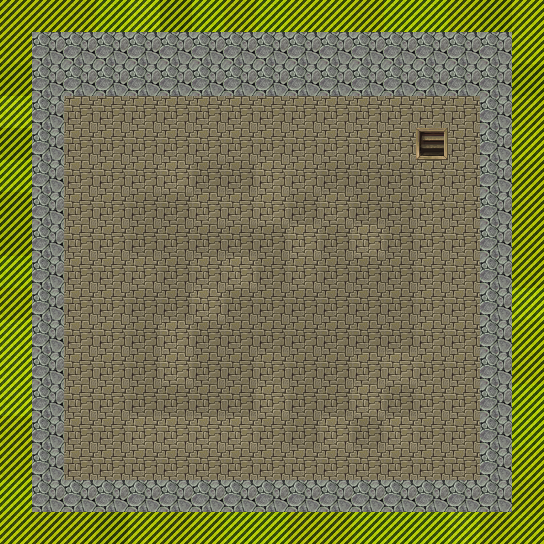
All object layers hidden (only tile layer plus estate borders visible):
Showing the ground layer:
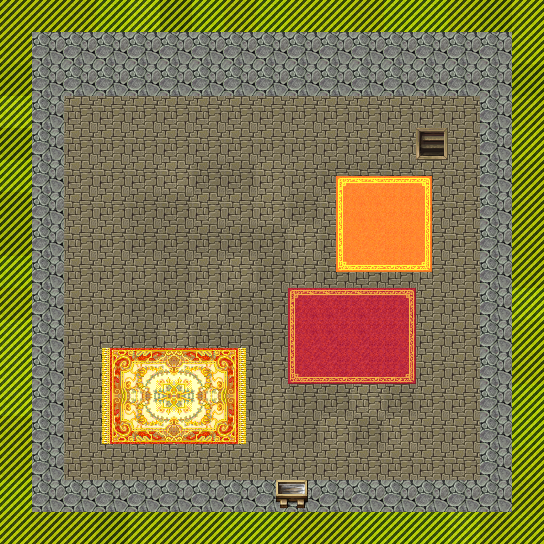
Adding the mid layer (as you can see, most of the action is taking place here):

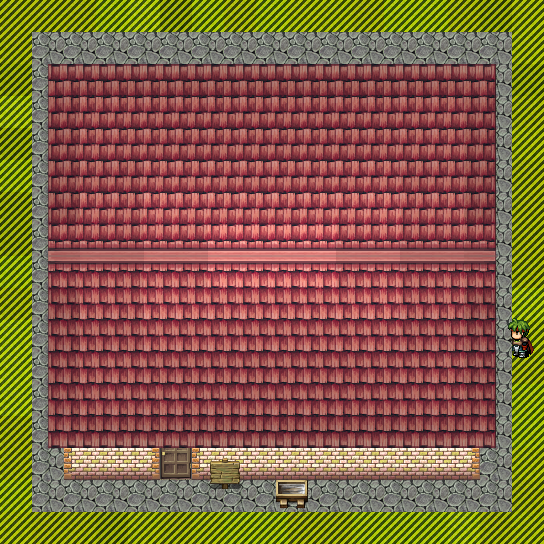
Finally, also showing the top layer:
Now that the basic layer concept has been clarified, let me explain the per-layer rendering order with four facts and a screenshot.
- Fact 1: The on-screen horizontal coordinate is X and the vertical coordinate is Y.
- Fact 2: In the direction from screen top to screen bottom the Y-coordinates become smaller.
- Fact 3: Objects with smaller Y-coordinates are drawn after objects with bigger Y-coordinates on the same layer.
- Fact 4: Every object is rendered so that its graphic bottom is at the object’s Y-coordinate.
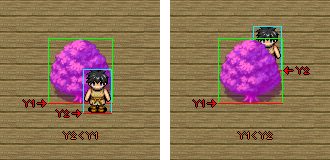
Simply put: objects, that are lower on the screen, are drawn later than higher ones on the same layer.
Switch the current layer by hitting the Switch Layer button ![]() or by spinning the mouse wheel.
or by spinning the mouse wheel.
Collision ![]() |
| ![]() |
| ![]()
We’ve tackled collision briefly before in the tiles section. When an area collides, one cannot move through it and the line of sight to dynamic objects is obstructed. Every static object is placed with one of three possible collision modes:
- No Collision

Straightforward. The object won’t obstruct any movement or line of sight.
- Partial Collision

Collision occurs according to the defined collision mask of the object graphic. Collision masks are manually done by the graphic uploader and are usually visible pixels from the bottom up to five pixels high, but not always. Sometimes the collision mask covers the stem of a tree or a round part of a table. The general rule is, that the collision mask has to make sense for the depicted object and should support the spatial impression.
- Full Collision

When you place an object with full collision, all opaque pixels of the object graphic provide collision.
For object collision only the mid layer is relevant. Collision properties for static objects on the ground or top layer are ignored.
Cycle through the collision modes by pressing the Collision button ![]() or by using control + mouse wheel.
or by using control + mouse wheel.
Using the Raster ![]()
To align static objects exactly to a certain raster (especially useful for building houses or similar), activate the raster by hitting the Snap to button or pressing R.
Placing/Removing Objects ![]()
Now that you know all about it, choose a graphic, a layer and a collision mode and click left on your property to place a static object. Object graphics cannot overlap with estate borders. Placing static objects costs nails and pixels. If you lack the latter, trade surplus pixels or go hunting.
To remove a static object, make sure you are currently in the correct layer and then click right on the object you want gone.
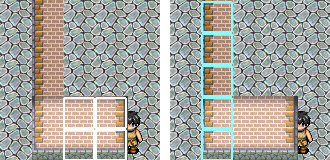
Adding Deco Objects ![]() +
+ ![]()
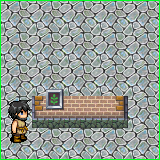
Assume you want to hang a picture on a wall.
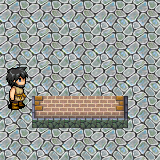
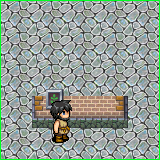
Doing it wrong. Placing it on the mid layer would result in the following. If you are confused why this happens, reread the section Layers and Rendering Order above.

Since the wall is on the mid layer, one could place the picture on the top layer, so it is drawn after the wall.
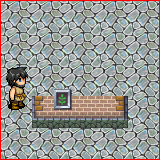
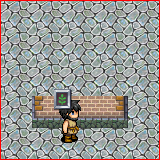
But since player objects also reside on the mid layer, the illusion fails when you come close to the picture.
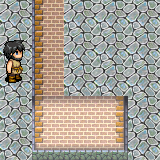
Doing it right. For cases like this you can place static objects as deco objects. To go into decoration placement mode, hit the Place as Decorative Object button ![]() in addition to the Place/Remove Static Objects button
in addition to the Place/Remove Static Objects button ![]() . You’ll notice that when you hover over objects on the current layer, they are drawn with an outline. Click left once on such an object to select it as base object. You succeeded, when there is a thicker outline around that object, even when you move the cursor away.
. You’ll notice that when you hover over objects on the current layer, they are drawn with an outline. Click left once on such an object to select it as base object. You succeeded, when there is a thicker outline around that object, even when you move the cursor away.
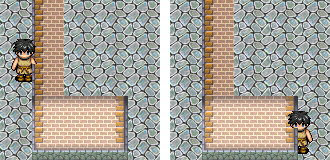
With the second left click you place the actual object as a deco object respectively to the selected base object. To deselect the base object, click right. Placing the picture like this produces the desired result.
Even when you go near it.
Technically, what happens, is that base objects are drawn in the regular rendering order (read above), while deco objects are rendered directly after their respective base object, thus undermining the regular rendering order. Although it would seem that it makes sense in most cases, a deco object doesn’t necessarily have to overlap with its base object.
Note: deco objects still exhibit the collision that was selected at placement. If the wall in the previous example was placed with partial collision, a player could go behind it. If then the picture was placed with partial or full collision, players could collide with it. So for situations like this you would want to place deco objects with no collision. Removing a static object also removes any deco objects that have that object as their base object.
Combining Objects ![]()
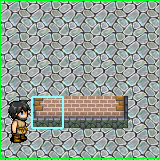
Again, let’s take a wall as an example. All single objects are placed on the mid layer.
But because of the object rendering order (read above) graphic glitches seem to occur when moving near the wall.
Some added outlines should help to illustrate the object boundaries and therefore to explain what happens when the scene is rendered.
The renderer behaves correctly, but a different result is desired. To correct this you can combine static objects. Objects combined that way are rendered as if they were one big object. We’ve aready established that an object’s Y-coordinate is decisive for it’s place in the rendering order. A combined object (meaning a whole combination of single objects) uses the lowest Y-coordinate of any included single object for that matter.
Combining objects is simple. Press the Combine Static Objects button ![]() . Now you are able to select single or already combined objects by hovering over them and clicking left. Once a selection is made you can add objects to it, again, by left-click or pressing the left mouse button down. You can also combine two combined objects into one big combined object. Separate objects from the combined object they are part of by clicking right on them or pressing the right mouse button down. Deselect the currently selected object by clicking left or right somewhere in the world, where there is no object on the current layer.
. Now you are able to select single or already combined objects by hovering over them and clicking left. Once a selection is made you can add objects to it, again, by left-click or pressing the left mouse button down. You can also combine two combined objects into one big combined object. Separate objects from the combined object they are part of by clicking right on them or pressing the right mouse button down. Deselect the currently selected object by clicking left or right somewhere in the world, where there is no object on the current layer.
A rule of thumb is: you probably would want to combine objects that somehow belong together and are vertically adjacent. In the previous example it would make sense to create two combined objects like so:
A Special Case: Combining Objects on the Top Layer ![]()
![]()
Combined objects on the top layer will yield an additional feature: when you come close to any object that is part of the combined object, the whole combined object will be omitted when it comes to rendering, thus making it invisible. This suits perfectly for roofs.
Combined Objects and Decoration ![]()
![]()
For simplicity I left one thing out when explaining deco objects. While the vertical rendering order is strictly determined by objects’ Y-coordinates, the horizontal rendering order of objects that have the same Y-coordinate is not determinate. In this example we want to put a blackboard on to a wall. The blackboard reaches over more than one wall object. Straightforward, we select one of the wall objects as base object and place the blackboard as deco object.
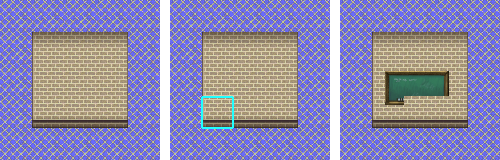
But since there is no guarantee that objects with equal Y-coordinates are rendered horizontally in a certain order, graphic glitches are likely to occur. Even when they don’t – this only means, that the leftmost lower wall object along with its blackboard is rendered after the middle and the right one. This may not be the case on other clients who visit your structure. It can even be different, when you restart your own client.
To be on the safe side, just combine the wall objects.
Combined objects can also serve as base objects for decoration. Placing the blackboard now as a deco object of the whole combined wall object will render it correctly and determinately.
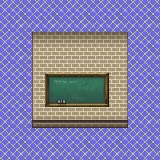
First the wall is rendered as a whole and directly afterwards the blackboard – being a deco object of the wall.
———————————————————————————————————–
Well, this was probably the most challenging chapter so far. So if you’ve read all the way through here,
WELL DONE!